
Ever had a moment where you were at a loss for words. That doesn’t happen to me too often which brings me to today’s post.
So, I am having a little bit of writers block today. I am currently testing some recipes that aren’t quite ready to be out on the blog, but I will have NEW recipes out next week, including my apple chutney recipe which is perfect to smother over a pork chop or a piece of chicken. More on that next week!
Since I am in the middle of things I wanted to share with you a few of my favorite blogs and some recipes I am obsessed with!
First off, my fave!
Lauryn Evarts at The Skinny Confidential.
The Skinny Confidential is one of my favorite blogs. I religiously read it!
Her motto is all about balance “kale in one hand, champagne in the other.” I absolutely love that! The two go so well together!
Lauryn covers everything on her blog from the fuzz on your feet and home decor, to travel delights and of course my favorite, food!
Balance is something that shines with this recipe.
Jerky is one of my favorite snacks, but lets face it, it’s not that good for you. Yet another reason to love this recipe! Earlier this year she posted about an amazing Watermelon Jerky recipe. HEALTHY.
In a nut shell, it is dehydrated watermelon. Sakara, the original creator of the packaged version explained it like this: “the watermelon snack is made with just one ingredient: organic watermelon. We kept it super simple, and this stuff is pure—no added sugar, no wacky chemicals, no artificial anything. Despite its simplicity, the watermelon pieces are loaded with fiber, vitamins, minerals, & potassium that, like all of Sakara Life’s vegan-friendly products, promote beauty from the inside out. While there are now plenty of vegan jerky snacks that attempt to replicate the taste and texture of chicken and beef in cruelty-free ways, this fruity dried snack presents an entirely new alternative to traditional savory jerky snacks.”
I have been drooling over this recipe all summer and it is so easy to make!
In Lauryn’s words:
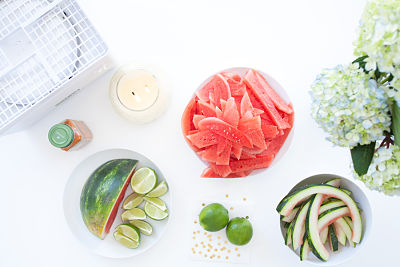
- big ass watermelon
- organic cayenne powder
- as much lime as you want!
directions: add to a dehydrator. cut watermelon into 1 inch slices. Discard ends & remove rinds. After removing the rind cut slices down to about 1/4 inch thick. Lightly add cayenne powder ( I like A LOT but it’s spicy so you need just a tad ) & then place watermelon slices on dehydrator. Once it’s in dehydrator squeeze a little lime on top. Dry at 135 degrees F for 18 ( YES, 18 ) hours.
Photo courtesy of The Skinny Confidential
You do need a dehydrator for this recipe, but as Lauryn says “Dehydrators are not outrageously expensive and allow you to save the harvest when it’s least expensive. Dehydrated fruits and vegetables require no added sugar or salt or preservatives. Plus you get all the fiber of the whole fruit and all the minerals.”
Basically, you have to try out this recipe for a light, healthy snack!
Next up…
Chungah at Damn Delicious.
Long before my own blog, as I was looking for recipes here and there I stumbled upon Damn Delicious. I have been following Chungah for years and her recipes are truly amazing. Chungah has no formal training but has been dominating the food blogging world since 2011.
I love the idea of “quick and easy meals for the everyday home cook.”
Sometimes I like to get a little crazy in the kitchen; Chungah, I believe, has found the balance between simple, yet delicious, which bring me too…
I am a carb fiend and LOVE chicken parmesan. I have been using this Baked Chicken Parmesan recipe for years now, adding my own Indian flare with cumin and chili powder mixed into the breadcrumbs!
- 1 pound spaghetti
- 2 boneless, skinless chicken breasts, cut crosswise in half
- 3/4 cup Italian style breadcrumbs
- 1/4 cup grated Parmesan cheese
- 2 tablespoons unsalted butter, melted
- 3/4 cup shredded mozzarella cheese
- 1 cup marinara sauce, homemade or store bought
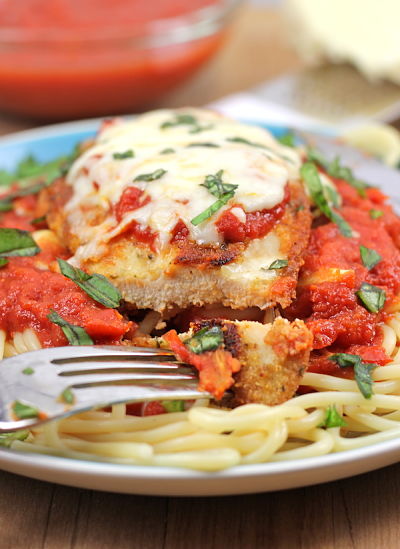
Photo courtesy of Damn Delicious
- Preheat oven to 450 degrees F. Line a baking sheet with parchment paper or a silicone baking mat; set aside.
- In a large pot of boiling salted water, cook pasta according to package instructions; drain well.
- In a small bowl, combine breadcrumbs and Parmesan. Working one at a time, brush butter on each chicken breast and dredge in breadcrumb mixture, pressing to coat.
- Place onto prepared baking sheet and bake for 20 minutes. Gently flip and bake until the crust is golden and the chicken is completely cooked through, about 5 minutes more.
- Remove from oven; spoon 1 tablespoon marinara on each chicken breast and sprinkle with 1-2 tablespoons mozzarella. Place into oven and bake until cheese has melted, about 5 minutes.
- Serve immediately with spaghetti and additional marinara, if desired.
This dish is incredibly easy and quick to make. “I don’t know about you guys but I tend to skimp on dinner. “Skimping” meaning I stick to Special K-type cereal dinners. I just get so exhausted when I come home from work, I can barely lift the cereal box out of the cabinet and pour it into a bowl.
That’s why I’m so glad I found this recipe. It’s easy, simple, so comforting and also perfect for work leftovers. All you have to do is dredge the chicken in a simple breadcrumb mixture, bake it for 25 minutes or so and then serve it with spaghetti and marinara. How simple is that?! This recipe has seriously saved me from so many cereal dinners. I need to stock up on some chicken breasts so I can make this again throughout the week!”
SEE! Now you can skip the cereal and get to the good stuff in a jiffy!
You all know I am all about Indian food and Indian fusion, that’s why my next favorite blog is…
Box of Spice by Rakhee Yadav.
Rakhee combines the beauty of food and the moodiness of her pictures to create nothing short of art. Her work is truly stunning. Rakhee cooks from her studio in the Netherlands, combining different varieties and fusions.
Just take a look at this Polenta Paneer Corn Dog!
“This paneer is first marinated in yummy spices and wrapped in polenta and then baked to perfect scrumptious-ness.”
Um, yes please!
- Ingredients for Marinade
- 1 cup yogurt
- 2 tbsps ginger garlic paste
- 1½ tsp kashmiri red chili powder
- ½ tsp turmeric powder/haldi
- 1 tsp cumin powder
- 1 tsp coriander powder
- ½ tsp garam masala powder
- 1 tsp dry mango powder
- 1 tsp chaat masala
- juice of half lemon
- 1 tsp oil
- rock salt or black salt
- 500 grams paneer, cut in flat slices
- Ingredients for the Polenta Dough
- 25 ml milk, lukewarm
- 3 grams dry active yeast
- 50 grams cooked polenta
- 1 tbsp olive oil
- 40 grams butter
- 1 tsp sugar
- 1 tsp salt
- 150 grams all purpose flour
- 3 grams baking powder
- 1 tsp red chilli powder
- 3-4 green chillies, chopped
- 2 tbsps cumin seeds
- 1 egg, beaten
- To prepare the marinade, in a large bowl, take the curd and whisk it till it becomes smooth. Add the ginger garlic paste and all the dry spices including the salt.
- Mix well.
- Add oil at this stage and mix well again. Add the paneer to the marinade. Marinate for at least 1 hour.
- Preheat oven to 180°C. Line a baking tray with parchment paper.
- To make the polenta dough. Cook the polenta according to instructions on your polenta pack. Add the butter and olive oil with red chilli powder and the chopped green chillies. Set aside and let cool completely.
- In a bowl mix the yeast with the lukewarm milk, till it bubbles a bit. Should take around five minutes.
- In a separate bowl mix the flour, the baking powder, sugar, salt. To this mix add the polenta mix and the yeast. Knead well with your hands till it comes together and form a ball. Wrap in clingfilm and let it rest in the refrigerator for an hour.
- After an hour, take the dough out and divide roughly in four parts. Roll out each part one at a time. Now cut out strips from your rolled out dough. Around an inch thick. Place a piece of marinated paneer at one end and wrap all around. Its almost like mummifying your paneer!
- Stick a wooden skewer at each end and place on your baking tray. Repeat till you run out of paneer.
- Brush each polenta wrapped paneer piece with egg wash and liberally sprinkle with cumin seeds on all sides. (I also sprinkled additional red chilli powder but you don’t have to.)
- Bake for 30 minutes or till the polenta wrapped paneer is nice and brown. Flip them after 15 minutes.
- Serve with spicy cilantro chutney.
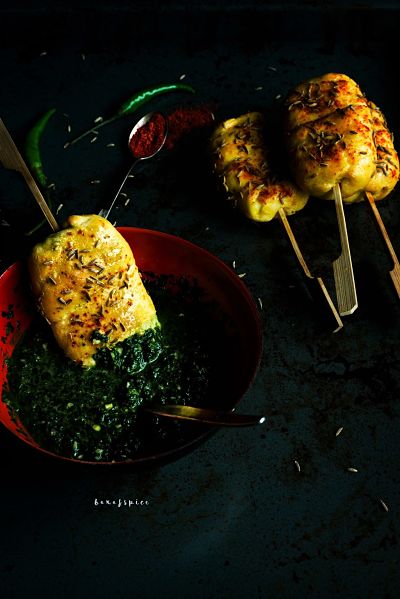
Photo courtesy of Box of Spice
If you aren’t too keen on Indian food, she has many other recipes to choose from. Even if you’re not in the mood to cook take a visit to her site and check out the photography. All the pictures are taken by her and remind me of a cold, stormy winter day. I stalk her photos on Instagram DAILY.
I couldn’t write this post without giving ya’ll something sweet!
SIDE BAR: I am a dessert ADDICT. Like, no joke. 9:30 pm will roll around, I’ll take a look at Justin and he knows what is going to come out of my mouth: “I want something sweet.”
Thankfully, Sally at Sally’s Baking Addiction has got me, and all of you covered in the dessert department.
Sally is a “self-taught, mom-taught, grandma-taught baker,” so you know, her skills set and recipes are authentic and delicious. Something about her site is incredibly warming and inviting, like I want to give the whole site a big hug!
Justin and I are guilty of late night cookies ( Sssshhh, don’t tell anyone! ) which is great (well, you know what I mean) because Sally has a ton of cookie recipes on her site. My favorite; Flourless Peanut Butter Brownie Cookies.
WOAH.
Every bit as good as they sounds.
- 1 large egg
- 1 cup (250g) honey roasted peanut butter, at room temperature (not warm)
- 1/3 cup (67g) light or dark brown sugar, lightly packed
- 1 teaspoon baking soda
- 1/4 cup (21g) unsweetened cocoa powder (Dutch-process can be used)
- 1/2 teaspoon vanilla extract
- 3/4 cup peanut butter chips

Photo courtesy of Sally’s Baking Addiction
Directions:
- Preheat oven to 350°F (177°C) and line two large baking sheets with parchment paper or silicone baking mats.
- In a medium bowl, whisk the egg until beaten. Mix in the peanut butter, then the brown sugar, baking soda, and cocoa powder. Mix everything together very well, then mix in the vanilla extract. Finally, fold in the peanut butter chips until combined.
- Scoop the dough, about 1.5 Tablespoons each, onto prepared baking sheet. Bake two batches – 6-7 cookies on each baking sheet each. Gently press down on the dough mounds with the back of a spoon. If you find the cookie dough balls are a little oily from your peanut butter– mine usually are– blot each with a paper towel.
- Bake for 9-10 minutes. The cookies will look very soft– that’s ok! For crispier cookies, bake up to 11-12 minutes. Allow the cookies to cool for 10 minutes on the baking sheet before transferring to a wire rack to cool completely. Sometimes I press a couple more peanut butter chips into the tops of each cookie immediately after coming out of the oven. This is optional and only for looks!
- Make ahead tip:Cookies stay fresh covered at room temperature for up to 1 week. Baked cookies freeze well – up to three months. Unbaked cookie dough balls freeze well – up to three months. Bake frozen cookie dough balls for an extra minute, no need to thaw.
So there you have it; a list of a few of my favorite blogs and recipes in the authors words. Let me know what some of your favorite blogs and recipes are!
I am off to get a taco.
Ciao!
